It’s 2022. You deserve smooth and cinematic gifs.
They’re sent to you as texts; hidden in your Facebook newsfeed; sandwiched in boring emails to make those emails seem otherwise less boring. They’re GIFs, a file format that stands for “Graphic Interchange Format.” And if you’re still looking for an explanation:
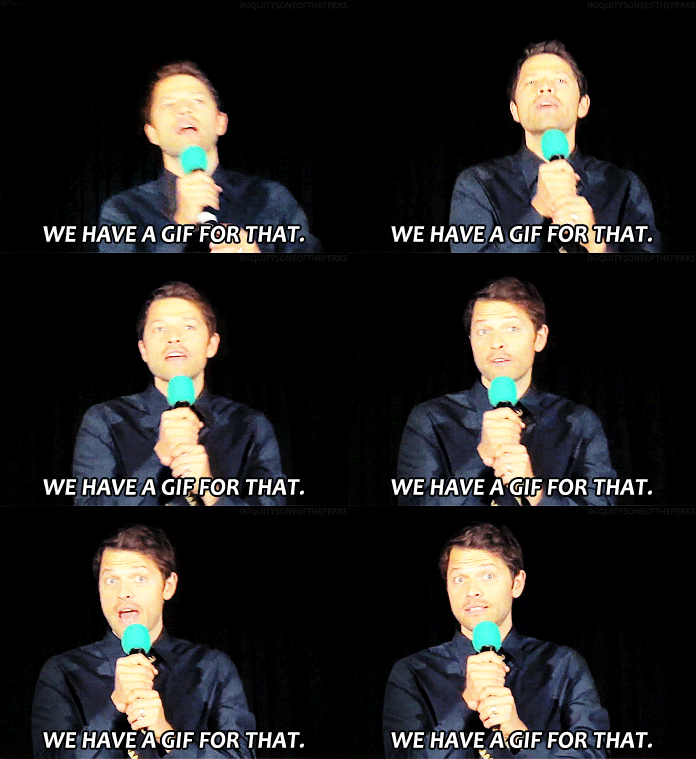
You might ask: why do GIFs always look pixelated and less colorful than videos? Well, the file format existed back when you needed to unplug your home phone to use the internet. With only 256 colors, they’re designed to be efficient, small files, best suited for short clips with pretty similar frames. Just take a look at the miraculously-still-maintained Bob Dole 1996 campaign website. That coffee mug animation? We regret to inform you it was groundbreaking at one point in time.
But first, a sidebar.
You might also ask: is it “jif” or “gif” with a hard G sound? The founder says “jif”. The Oxford Dictionary says either. So we’ll leave it to you. So it really depends if you’re a prescriptive or descriptive linguist. You’ll probably get teased less if you say it with the hard G and not like the peanut butter brand.
Anyway. For as widespread as GIFs have become, they, unlike videos or images, usually look pretty outdated. Most GIFs look small and low resolution, like the one above. It’s hard to make a series of moving images about the same file size as just one static image, like a JPEG. And since they get shared so often, the same video gets compressed and looks worse each time it gets saved and re-uploaded.
Basically, most GIFs get the job done. Without needing to send a YouTube link, you can easily embed a perfectly-timed movie reference or reaction into your conversations. But are they pretty to look at?

Luckily for aspiring GIF creators, there’s good news. Content makers across the internet are coming up with new and effective ways to stop the small, choppy frames and start producing high-quality GIFs like this one:
The Deal with High-Quality GIFs
No, we’re not kidding you.
Actually, there’s a whole Reddit community (r/HighQualityGIFs) devoted to the subject. Its mission is laid out in the community description as, “GIFs that are better quality than your mother’s GIFs.” In more specific terms, these GIFs prioritize a few key components: resolution, smoothness, visual effects, and software.
You can get some of these effects by following the best practices, which we’ll show you below. But there’s also some new tech that makes sharing smooth, colorful video clips even easier. Image hosting websites GIPHY and IMGUR have invented new file formats that basically show video clips like they’re GIFs — you can embed them in stories, share them in texts, or save them as old-school GIFs to share in emails and other places that aren’t quite ready for the GIFV revolution yet.
With all these new file formats and uploading websites, you’re in the middle of a GIF Renaissance. You’ll soon look back on the grainy, 200 pixels wide images you used to share with a kind of wistful, nostalgic shame. It’s time you started making smooth, colorful, cinematic looping videos with some added special effects for flourish. Here’s how to edit videos with subtitles and other special effects, save the files, and then create both old-school high-quality GIFs and new-school high-quality GIFV files.
How to Find GIF Footage
It’s not rocket science: the GIF and GIFV formats are built to display quickly, which means they need to be small, which means they need to discard a lot of data, like pixels and colors. Whether you are making a GIF of a YouTube video, a movie clip, or your own work, start with the highest quality footage available, because it’s only going down from here.
Short, repeating loops work the best — movie one-liners, short YouTube clips, and clips with limited, repeated movements are all good places to start. The most classic GIFs are basically repurposed videos, but shorter and able to loop without an abrupt transition.
And yet, some of the most beautiful GIFs feel more like photos with a pinch of movement. Like these cinemagraphs made by Kevin Burg and Jamie Beck, which you can learn how to make here.
Fortunately, you don’t have to be a pro at obtaining the best footage yourself. There’s lots of material freely available online. You can download and leverage footage from YouTube and Netflix by using free sites like www.keepvid.com and www.savefrom.net.
How to Edit GIFs
Once you’ve got the source footage, you’re ready to turn it into a GIF. It sounds hard, but transforming a video to a GIF isn’t too difficult. If you just wanted to turn a portion of a YouTube clip or video into the GIF file format—no subtitles, transitions, or other special effects—you don’t even need extra software. Try this GIPHY GIF maker. Or this one from IMGUR. Those are the two main sites for hosting your GIF, so it makes sense to create your GIF there, too. Just drop the web link or file, and boom: you’ve got a GIF. Or a file that works pretty much exactly like one.
If only your GIF-fing forefathers could see how easy you have it.
But to really make a GIF stand out you’ll want full control over the type, effects, and looping effects. So you’ll need to edit the footage as a video, converting it to a GIF at the end of the process.
Though most of the pros use Adobe After Effects or Adobe Photoshop in some combination, there is lots of new software that makes special effects with GIFs possible. Programs like NukeX, GIMP and Blender are all free software on which you can edit and produce original GIFs.
For those using After Effects, programs like GifSquid are made to make GIF creation easier as a plugin for that program. GifSquid helps you render GIFs straight from After Effects. If you’re using Photoshop, you’ll want to learn how to import video into the program so you can edit each frame with this tutorial here.
Most GIFs overlay text, since, you know, there’s no sound to hear what the character is saying. But if you overlay big, fat, Comic Sans speech bubbles over your video, you’ll undermine all that hard work you did in getting the high-quality footage in the first place. Take it from the HQ artists in the r/HighQualityGIFs subreddit: you have to consider a few components while laying out text on a GIF: font, color and layer styles.
For the font, they suggest using a serif font to make the text easier to read. They link to Google Fonts as a good source for font finding and recommend fonts like Coolvetica and Gotham for clear reading. For text color, they warn against harsher tones like bright pinks and greens, even black and white can be too intense.
For layer styles, they say you may want to add a drop shadow or outline to the text. However, with the motion of the GIF, this can become tricky. With limited data for pixels and colors, it can be hard for these effects to look realistic and natural as the image moves from frame to frame.
Fidget with the text so it shows up in the right frames — the more it feels like perfectly timed karaoke subtitles, the better. Once you’ve lined it all up, you now have a completed video. Now, we’re off to the technical part: retaining as much of the details and color as possible while exporting the GIF at a size that won’t take 10 years to load.
How to Export GIFs
Depending on your creation software, you’ll have different export settings. However, one rule of thumb across the board is to not export your GIF too large. While many GIFs fail by being too small, HQ GIFs can tend to be too large. It’s recommended not to export your GIF wider than 960 pixels. You might be tempted to blow it up, having seen it in full, high-quality glory on your editing software. But since it’ll mostly be shared on phones and in boring emails, limiting the size is the best way to keep the file size down while keeping the quality high.
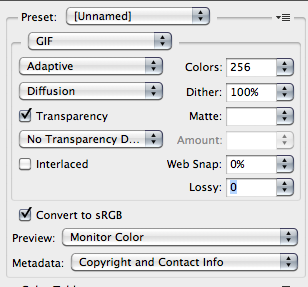
For reference, here is an ideal setting configuration for exporting in Photoshop:
Aim for under 2MB if you’re trying to make something ultra-shareable, which will require trimming down the length of your clip and further shrinking the size if necessary. Big-time GIF artists, who know their fans have all the internet bandwidth they could ever need, go to 10MB and beyond. But beware: if a GIF takes 9 seconds to load and it’s only 4 seconds in the first place, you’ll have some unhappy customers.
If your file is still looking pretty large, Web Snap and Lossy can shrink things down, which is sometimes necessary for, say, a 20-second movie scene. But we’re here to make high-quality gifs, not high-length gifs. And we’re sorry: if we’re going to re-watch over 20 seconds of Wolf of Wall Street, we’re probably going to want to do so with some audio. Keep it short, and you get to keep your clip beautiful.
How to Host GIFs for Sharing
Depending on the software you use, you’ll either end up with a finished video file or a finished GIF file. And now you’ll want to shrink it and get it hosted on the web.
This is where even the most vaunted of GIF artists trip up. But don’t worry: If all those software skills and export specifications are out of your depth, there are streamlined methods of GIF creation and uploading optimized for users like you. Websites like Giphy and IMGUR have intuitive built-in tools that transform your too-large video or GIF file into a smaller, shareable version. Just drag it into the site, and minutes later, you’ll have a web link of your GIF, with different sizes (and file formats) to make sure your looping video looks its best no matter where you share it.
Share it with your friends. Put it on your website. Make the perfect GIF for the perfect Twitter reply to that user you desperately want to impress with your slick references. And if you need inspo? Head to the experts over at the HQ GIF subreddit to stay on top of the newest trends. Who knows? One day, you might end up on that top page—we think that’s an accomplishment you can brag about on your LinkedIn.
Curious about how to create GIFs for Instagram, specifically? For more information, be sure to check out our guide on creating GIFs for Instagram.
